Getting Started with Ververica Platform on Amazon AWS
It has been a while since our original blog post on how to setup Ververica Platform on Amazon Web Services (AWS) was published. Many aspects have been improved and new features have been added to Ververica Platform since then. It is time for an update and an extension on the topics which were not covered before. This article will guide you through the process of deploying and running Ververica Platform on AWS. You will create an Amazon Elastic Kubernetes Service (EKS) Cluster on AWS, then set up Ververica Platform with a database created with Amazon Relational Database Service (RDS) as the persistence layer and an S3 bucket as the storage provider. At last, you will configure Ververica Platform authentication and authorization with Amazon Cognito.
Prerequisites
Before getting started, please make sure you have the following:
-
A valid Amazon AWS account with EKS, RDS, S3, and Cognito services enabled.
-
AWS CLI, kubectl, eksctl, jq, and helm installed on your local machine.
-
A Ververica Platform Stream Edition commercial license, or get a trial one here.
Create an EKS Cluster
Ververica Platform runs on a Kubernetes cluster, the easiest way to get started on AWS is with their managed Kubernetes offering EKS. Our original blog post has shown how to create an EKS cluster with AWS Console and AWS CLI. In this blog post, you will use the relatively new official AWS command line tool eksctl.
$ aws configure
$ eksctl create cluster --name vvp-cluster --nodes 3 --nodes-max 3
$ kubectl get nodes
Wait until the command is finished and the cluster is successfully provisioned, this may take some time. Within this EKS cluster you will create two Kubernetes namespaces: vvp, to run Ververica Platform and flink, to run Flink jobs.
$ kubectl create namespace vvp
$ kubectl create namespace flink
We recommend running Ververica Platform in a separate namespace from your Flink jobs for better isolation between the control plane and data processing applications.
Create a MySQL database with Amazon RDS
Ververica Platform requires a minimal persistence layer to store the platform metadata. Out of the box it will use a SQLite database stored on a persistent volume. Users of Ververica Platform Stream Edition can configure persistence to an external relational database. In a production environment, we recommend using an external database for easy backup and maintenance.
For this installation you will create a MySQL database with Amazon RDS. You can skip this section if you already have a MySQL instance (or another type of relational database supported by Vervierca Platform) running somewhere given that (1) it contains a database named vvp and (2) it is accessible from the EKS cluster.
$ DB_JSON=`aws rds create-db-instance --engine mysql \
   --db-instance-class db.m5.large \
   --db-instance-identifier vvpdb \
   --allocated-storage 10 \
   --db-name vvp \
   --master-username USERNAME \
   --master-user-password PASSWORD`
This command creates a MySQL instance vvpdb, and the database vvp in it. Remember to replace USERNAME and PASSWORD with your desired values. This command returns a JSON output immediately while the database is being created asynchronously in the background. The JSON output is assigned to the variable DB_JSON.
Next, add an inbound rule to the security group of the created MySQL instance such that it is accessible from the created EKS cluster. For simplicity, this example opens the default port 3306 to any source IP addresses:
$ securityGroupID=`echo $DB_JSON \
   | jq -r '.DBInstance.VpcSecurityGroups[0].VpcSecurityGroupId'`
$ aws ec2 authorize-security-group-ingress --group-id $securityGroupID \
  --protocol tcp --port 3306 --cidr 0.0.0.0/0
Create an S3 Bucket
The Universal Blob Storage in Ververica Platform acts as centralized storage for job artifacts, checkpoints, savepoints, and high availability metadata. For Flink SQL jobs, it also holds the job graphs and the JAR files of User-defined Functions. Universal Blob Storage seamlessly supports the native file storage services of all major cloud providers, e.g., S3 on AWS.
Create an S3 bucket:
$ aws s3 mb s3://vvp-bucketTo grant Ververica Platform permissions to access S3, you can extract the node group role of the EKS cluster and attach an S3 access policy to it:
$ IAM=`eksctl get iamidentitymapping --cluster vvp-cluster --output json`
$ nodeGroupRole=`echo $IAM | jq -r '.[0].rolearn' | cut -d/ -f2`
$ aws iam attach-role-policy --role-name $nodeGroupRole \
   --policy-arn arn:aws:iam::aws:policy/AmazonS3FullAccess
For demonstration purposes, this example attaches the policy AmazonS3FullAccess here. This means Ververica Platform will be able to access any S3 buckets in your AWS account. For better security, you can create your own policy and restrict permissions to a specific S3 bucket.
Setup Ververica Platform
Ververica Platform is distributed via a Helm chart which is available in our Helm Charts Repository. To add the repository to helm, run:
$ helm repo add ververica https://charts.ververica.com Ververica Platform can now be installed with helm install. But first, lets prepare a few Helm Values files containing our custom configuration.
Platform Metadata
Check the AWS console to make sure the MySQL instance has been created and is active, then create a Values file values-db.yaml:
vvp:
 persistence:
  type: jdbc
  datasource:
   url: jdbc:mariadb://MYSQL-SERVER:3306/vvp
   username: USERNAME
   password: PASSWORD
where USERNAME and PASSWORD are the values you set when you created the MySQL instance, and MYSQL-SERVER is the database endpoint which you can get by clicking the MySQL instance name in the AWS console and checking the Connectivity & security tab or by running the following command:
$ aws rds describe-db-instances --db-instance-identifier vvpdb \
  jq -r '.DBInstances[0].Endpoint.Address'
Universal Blob Storage
Create another Values file values-blob.yaml to back Universal Blob Storage by the created S3 bucket:
vvp:
 blobStorage:
  baseUri: s3://vvp-bucket
Kubernetes Namespace
Finally, create a Values file values-ns.yaml to allow Ververica Platform to create and manage Flink jobs in the flink Kubernetes namespace.
rbac:
 additionalNamespaces:
  - flink
With this setting, a Kubernetes role with the required rules will be automatically created in the flink Kubernetes namespace and the Ververica Platform service account will be bound to this role.
Now, together with your commercial/trial license file, Ververica Platform can be installed and started in the EKS cluster by running:
$ helm install vvp ververica/ververica-platform --namespace vvp \
    --values values-db.yaml \
    --values values-blob.yaml \
    --values values-ns.yaml \
    --values values-license.yaml
Once all of the three containers in the Ververica Platform pod reach the Running status, Ververica Platform is ready.
$ kubectl get pod -n vvp
NAME                   READY  STATUS  RESTARTS AGE
vvp-ververica-platform-59c69c4c46-7jljt  3/3   Running  0     48s
Deploy a Flink Job with Ververica Platform
Now that Ververica Platform is up and running, it is time to run your first Flink job. Begin by port-forwarding port 80 of the created Kubernetes service vvp-ververica-platform in the vvp Kubernetes namespace to local port 8080:
$ kubectl port-forward service/vvp-ververica-platform 8080:80 -n vvp
you can then access the Ververica Platform Web UI at http://localhost:8080.
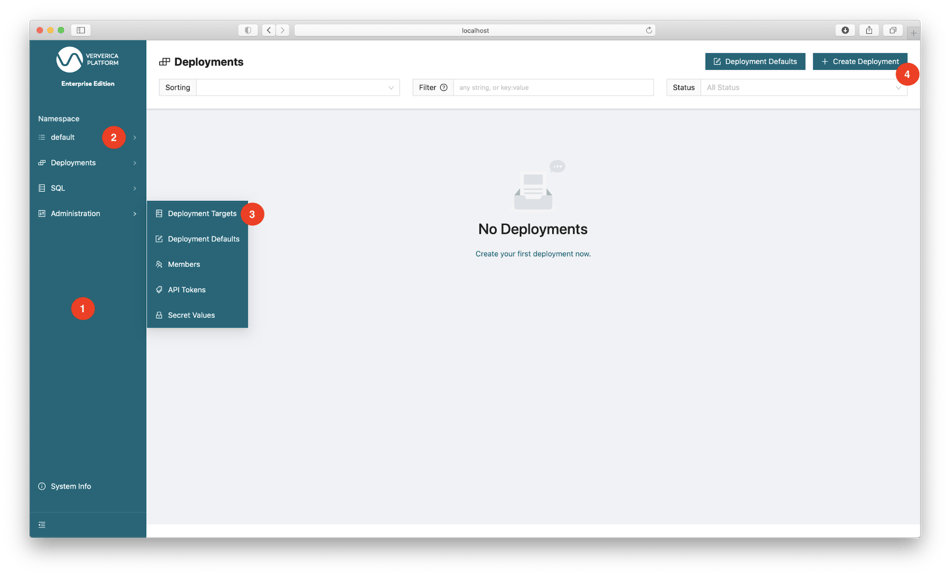
At the left side of the Web UI is the menu bar (1) where you have access to different functionalities. Like Kubernetes, Ververica Platform also uses Namespaces to manage resources and support multi-tenancy. While serving a similar purpose as Kubernetes Namespace, Ververica Platform Namespace is an independent concept. The top of the menu bar shows that we are in the default namespace (2) of Ververica Platform.
Ververica Platform uses Deployments to manage the lifecycle of Flink jobs. Each deployment is associated with a Deployment Target which specifies the Kubernetes namespace to run the Flink job. Navigate to menu bar: Administration | Deployment Targets (3), click + Add Deployment Target and fill in:
-
Deployment Target Name: flink
-
Kubernetes Namespace: flink
With this deployment target, your deployment will be able to run in the flink Kubernetes namespace of the underlying EKS cluster.
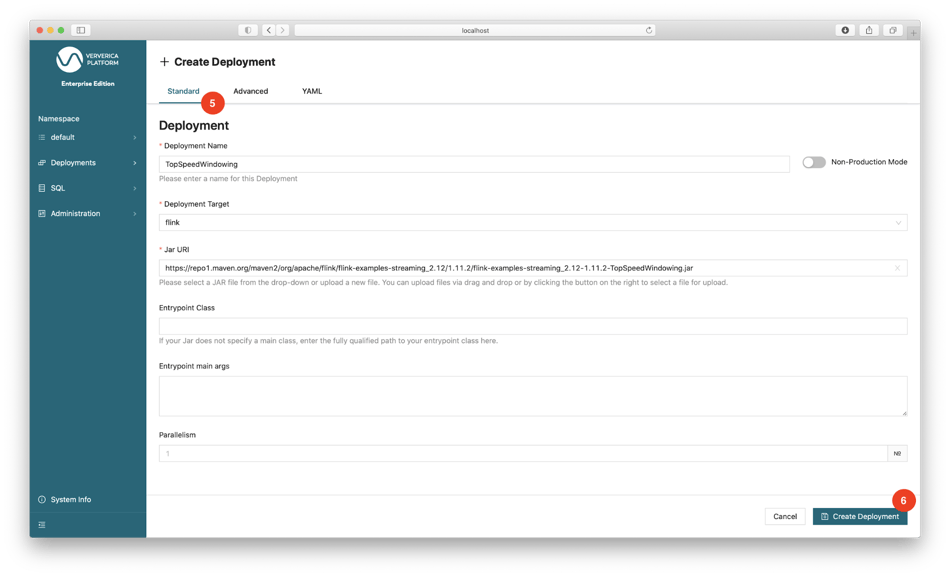
To create a deployment, navigate to menu bar: Deployments | Deployments, click + Create Deployment (4), switch to the Standard editor (5) and fill in the following fields, then click Create Deployment (6):
-
Deployment Name: TopSpeedWindowing
-
Deployment Target: flink
-
JAR URI: drag & drop your job JAR file to this field, or use this example job that is distributed via Flink’s maven repository
After the deployment is created, you can start it by clicking the Start button (7) and watch the Events tab (8) to see what is happening. Its status should eventually change to RUNNING (9). Now is a great time to explore the various operations and information available in Ververica Platform. For example, you can click the Flink UI button (10) to access the job’s Flink UI. The buttons Metrics and Logs will remain inactive because they have not been configured. The Ververica Platform documentation and the Ververica Platform playground offers details and examples of such configurations.
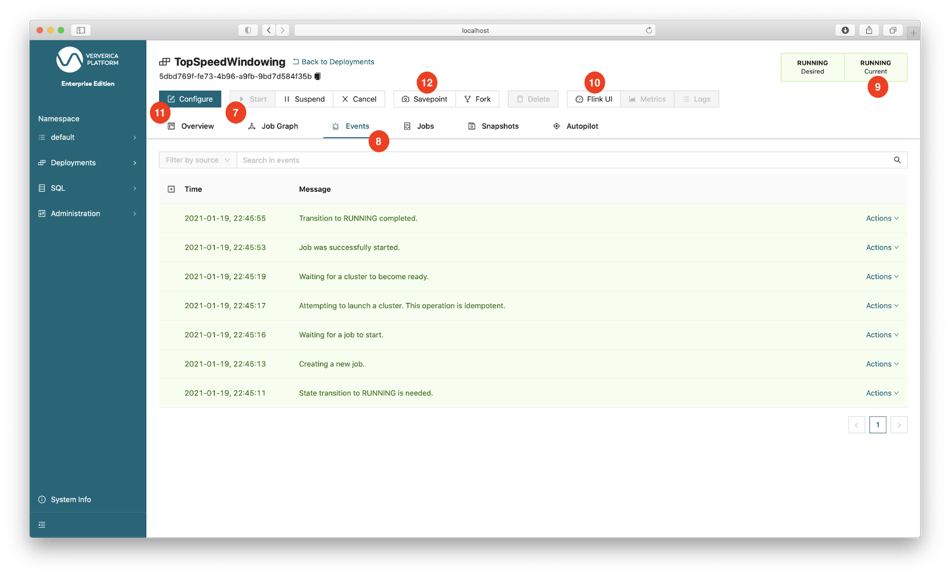
You can reconfigure the deployment by clicking Configure (11). Look around in the Standard/Advanced/YAML (5) editor to see what other options are available. If some configurations are changed, Ververica Platform will take a savepoint of the Flink job, restart the deployment with the new configuration, and resume the job from the created savepoint. To trigger a savepoint manually, click the Savepoint button (12).
To run Flink SQL jobs on Ververica Platform, please refer to our blog post Ververica Platform 2.3: Getting Started with Flink SQL on Ververica Platform.
Setup Authentication with Amazon Cognito
Ververica Platform does not manage user credentials itself, instead, it supports integration with OpenID Connect (OIDC) identity providers (IdP) for authentication and authorization. If you are not familiar with OIDC, this talk provides a pretty good explanation. At a high-level, this means Ververica Platform integrates with your existing identity management system. In the remainder of this section, we will use Amazon Cognito as our IdP and show the steps to integrate it with Ververica Platform. If you use a different IdP, you will need to follow its own procedure.
First, you create a user pool, i.e., the IdP:
$ USERPOOL_JSON=`aws cognito-idp create-user-pool --pool-name vvpusers`
$ userPoolId=`echo $USERPOOL_JSON | jq -r '.UserPool.Id'`
then store the user pool ID in the variable userPoolId. This variable will be used in all of the following aws cognito-idp commands. Now you create an app client in the user pool:
$ aws cognito-idp create-user-pool-client \
   --user-pool-id $userPoolId \
   --supported-identity-providers COGNITO \
   --client-name vvp --generate-secret \
   --callback-urls http://localhost:8080/login/oauth2/code/vvp \
   --logout-urls http://localhost:8080/logout \
   --allowed-o-auth-flows code \
   --allowed-o-auth-scopes profile openid \
   --allowed-o-auth-flows-user-pool-client
The callback and logout URLs are the URLs of Ververica Platform. Here it is assumed that the Web UI is accessible via port forwarding as described before. If you already have a dedicated DNS entry for accessing Ververica Platform that should be used in place of localhost. Note down the values of UserPoolClient.ClientId and UserPoolClient.ClientSecret, you will need them in a Helm Values file later.
You also need to create an Amazon Cognito domain where Ververica Platform will redirect the login requests to:
$ aws cognito-idp create-user-pool-domain \
   --user-pool-id $userPoolId --domain vvp
This will create the domain:
https://vvp.auth.REGION.amazoncognito.com.
Here REGION is the AWS region you are in.
Next, create two users (vvpadmin and vvpuser) each with the temporary password My-Pass0 and one group (vvpviewer) in the User Pool and add vvpuser into the group vvpviewer.
$ aws cognito-idp admin-create-user --user-pool-id $userPoolId \
   --username vvpadmin --temporary-password My-Pass0
$ aws cognito-idp admin-create-user --user-pool-id $userPoolId \
   --username vvpuser --temporary-password My-Pass0
$ aws cognito-idp create-group --user-pool-id $userPoolId \
   --group-name vvpviewer
$ aws cognito-idp admin-add-user-to-group --user-pool-id $userPoolId \
   --username vvpuser --group-name vvpviewer
Now that the IdP side is ready, you can configure Ververica Platform by creating the file values-auth.yaml:
vvp:
 auth:
  enabled: true
  admins:
  - user:vvpadmin
  oidc:
   groupsClaim: cognito:groups
   registrationId: vvp
   registration:
    clientId: CLIENT-ID
    clientSecret: CLIENT-SECRET
    redirectUri: "{baseUrl}/{action}/oauth2/code/{registrationId}"
    clientAuthenticationMethod: basic
    authorizationGrantType: authorization_code
    scope:
    - openid
    - profile
   provider:
    issuer-uri: https://cognito-idp.REGION.amazonaws.com/USER-POOL-ID
    userNameAttribute: username
   endSessionEndpoint: "https://vvp.auth.REGION.amazoncognito.com
/logout?client_id=CLIENT-ID&logout_uri=http://localhost:8080/logout"
Do not forget to replace USER-POOL-ID, CLIENT-ID, CLIENT-SECRET and REGION with the actual values you get when creating the user pool and the app client. In the YAML file, we configure user:vvpadmin as an administrator of Ververica Platform who will have the full permissions. The user group membership is passed from Cognito to Ververica Platform via the groupsClaim cognito:groups. redirectUri contains placeholders which will be replaced by Ververica Platform automatically. endSessionEndpoint contains logout_uri which must be the same as the logout URL of the created app client.
You can now upgrade Ververica Platform with the file values-auth.yaml:
$ helm upgrade vvp ververica/ververica-platform --namespace vvp \
    --values values-db.yaml \
    --values values-blob.yaml \
    --values values-ns.yaml \
    --values values-license.yaml \
    --values values-auth.yaml
After Ververica Platform is restarted, open the Web UI, you will be asked to log in. Fill in the username vvpadmin and the temporary password My-Pass0. Set a permanent password when asked. After login, your username will be shown at the bottom of the menu bar (13).
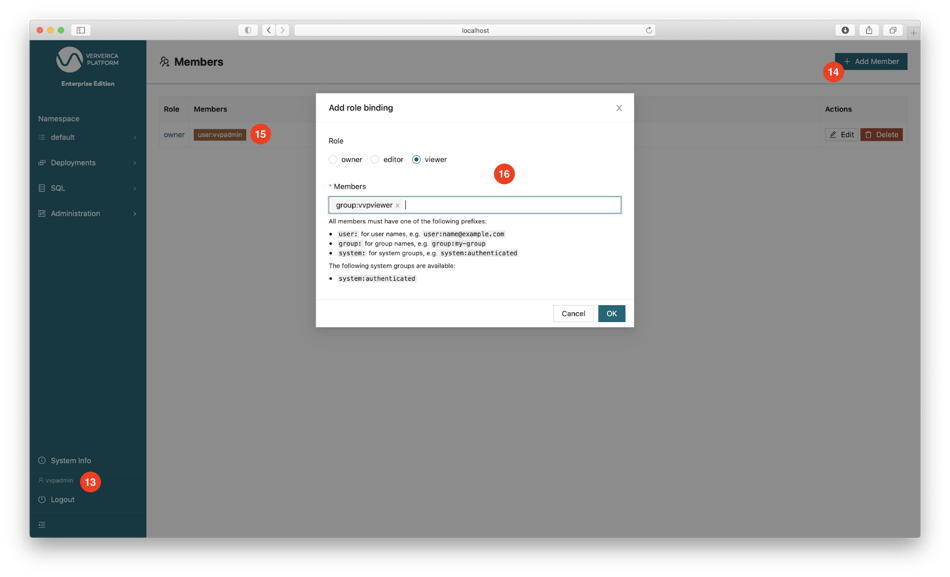
In addition to authentication, you can configure Role-Based Access Control (RBAC) by binding different users to different roles. Apart from the Admin role, Ververica Platform supports three additional roles: Owner, Editor, and Viewer, each granted different permissions. For example, you can bind the user vvpuser to a Viewer role that is not allowed to create any deployment or change anything in Ververica Platform. Log in to the Web UI as vvpadmin (i.e., the administrator), go to the menu bar Administration | Members, delete the owner role binding to system:authenticated, click + Add Member (14) to add the following two role bindings: bind user:vvpadmin to the owner role (15) and group:vvpviewer to the viewer role (16). Then open the Web UI in a private browser window and log in as the user vvpuser. You will see that some buttons and some sub-menu items on the menu bar are grayed out.
Summary
This blog post demonstrates how to install and configure the latest Ververica Platform on AWS. We covered how to create an EKS cluster, how to set up Ververica Platform with a MySQL database as the persistence layer and Universal Blob Storage backed by an S3 bucket. We also described the procedure to configure authentication & authorization with Amazon Cognito.
For more details on these topics or other features of Ververica Platform, please refer to the Ververica Platform documentation. Feel free to contact us or leave comments below for any other questions.

You may also like

Meet the Flink Forward Program Committee: A Q&A with Lorenzo Affetti
Meet Lorenzo Affetti, a Program Committee member for Flink Forward 2025, ...

Outrun Fraudsters with Agentic AI and Ververica
Enhance fraud detection with agentic AI and Ververica's real-time stream ...
KartShoppe: Real-Time Feature Engineering With Ververica
Discover how KartShoppe leverages Ververica’s real-time feature engineeri...
Maximize Efficiency: How Ververica's BYOC Deployment Optimizes CAPEX and OPEX
Learn how Ververica's BYOC deployment leverages CAPEX and OPEX to optimiz...


