


In this step-by-step guide, we will walk through the process of integrating the Ververica Platform with Azure Kubernetes Service (AKS) using Azure AD workload identity. This integration allows users to manage and deploy Apache Flink applications seamlessly on AKS while leveraging Azure services for authentication and resource access. For a comprehensive understanding of Azure AD workload identity, please refer to the overview documentation on the official Microsoft website.
Prerequisites
To successfully navigate through this tutorial, ensure that you have the following:
- Azure CLI
- Helm v3
- kubectl
- Azure Subscription
- Azure Resource Group: Ensure you have an Azure Resource Group within your subscription.
- Ververica Platform license: In this tutorial, we will be using the Ververica Platform Community Edition license agreement, which allows for periodic, anonymous reporting of usage metrics to Ververica. This includes platform version and deployment details, with the option to disable this reporting. It's worth noting that the Enterprise Edition does not transmit any analytics data.
What is involved
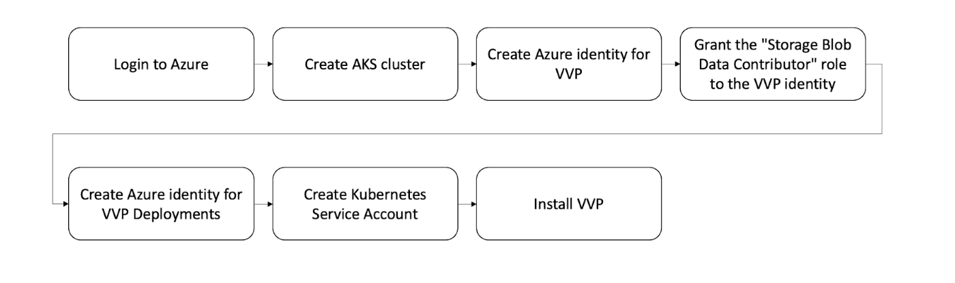
Step 1: Log In
Start by logging into Azure:
az loginIf you're using an organizational account, you can log in using your organization’s tenant ID:
az login --tenant <<YOUR-TENANT-ID>>
Upon successful login, you will see a JSON representation of your Azure subscription, including details such as the name of the Azure cloud environment, the unique identifier for the subscription, its status, as well as details about the user currently using the subscription.
Step 2. Create AKS cluster
We will now need to create an Azure Kubernetes Service (AKS) cluster called myAKSCluster with Azure AD workload identity enabled. Before doing this, make sure that you have enough quota for the AKS nodes in your Azure region.
az aks create
-g <<NAME-OF-RESOURCE-GROUP-FOR-THE-CLUSTER>>
-n myAKSCluster --enable-oidc-issuer --enable-workload-identity
-s standard_D8s_v3 --node-count 1 --generate-ssh-keys
This command is creating an AKS cluster with a single node, using standard_D8s_v3 VMs for the nodes, enabling OIDC issuer and workload identity, and automatically generating SSH keys.
Upon successful execution, you'll receive a JSON confirmation signifying the current status and configuration of your Azure Kubernetes Service (AKS) cluster.
Step 3. Create Azure identity for VVP
Let's now dive into the process of creating an Azure identity for the Ververica Platform (VVP). But before we begin, we need to set up some environment variables:
export SUBSCRIPTION_ID="<<YOUR-AZURE-SUBSCRIPTION-ID>>"
export USER_ASSIGNED_IDENTITY_NAME="vvp-user-ident"
# This is a user-defined name for the Azure Managed Identity we're creating.
# You have full flexibility here, but for our example, we're going with vvp-user-ident.
export RG_NAME="<<YOUR-AZURE-RESOURCE-GROUP-NAME>>"
export LOCATION="<<YOUR-AZURE-REGION>>"
export AKS_NAME="myAKSCluster"
export AKS_OIDC_ISSUER="ISSUER-URL-OF-YOUR-AKS-CLUSTER"
# You will see this URL in the JSON confirmation of the previous step
export SERVICE_ACCOUNT_NAMESPACE="vvp"
# Kubernetes namespace where your service account will be created.
# You can choose any suitable name.
export SERVICE_ACCOUNT_NAME="vvp-ververica-platform"
# Name of your Kubernetes Service Account.
# Again, you're free to choose the name you prefer.
With our environment variables set, we can move on to creating a new Azure Managed Identity:
az identity create
--name "${USER_ASSIGNED_IDENTITY_NAME}"
--resource-group "${RG_NAME}"
--location "${LOCATION}"
--subscription "${SUBSCRIPTION_ID}"
After successfully running it, you'll receive a JSON output that provides information about the created identity. Next, let's assign the clientId of the identity we just created to an environment variable named USER_ASSIGNED_CLIENT_ID:
export USER_ASSIGNED_CLIENT_ID="$(az identity show
--resource-group "${RG_NAME}"
--name "${USER_ASSIGNED_IDENTITY_NAME}"
--query 'clientId' -otsv)"
We're storing the clientId for easy and quick reference in our script or session later on. This ID will come in handy for authentication or authorization purposes in subsequent Azure commands or API calls.
Let's now create a federated credential for the VVP identity:
az identity federated-credential create --name userVvp \
--identity-name "${USER_ASSIGNED_IDENTITY_NAME}" \
--resource-group "${RG_NAME}" --issuer "${AKS_OIDC_ISSUER}" \
--subject
system:serviceaccount:"${SERVICE_ACCOUNT_NAMESPACE}":
"${SERVICE_ACCOUNT_NAME}" \
--audience api://AzureADTokenExchange
On successful execution, Azure will return a JSON response, signifying that a federated credential for the VVP user-assigned identity has been created.
Our next step is to get credentials for your AKS cluster, so that you can interact with it using kubectl:
az aks get-credentials -n ${AKS_NAME} -g ${RG_NAME}When successful, you'll receive a response similar to the following:
Merged "myAKSCluster" as current context in /Users/<<YOUR-USERNAME>>/.kube/configStep 4: Grant the "Storage Blob Data Contributor" role to the VVP identity
Now we need to grant appropriate permissions to the Ververica Platform's user-assigned identity. This will allow VVP to access the required storage container.
Firstly, you will need to determine the ID of the user-assigned identity that has already been created, as shown below:
export USER_ASSIGNED_IDENTITY_ID=$(az identity show
--resource-group "${RG_NAME}"
--name "${USER_ASSIGNED_IDENTITY_NAME}"
--query 'id' -otsv)
Next, it's time to create a storage account. However, if you already have one, feel free to skip this step:
az storage account create
--name "<<YOUR-STORAGE-ACCOUNT-NAME>>"
--resource-group "${RG_NAME}"
--location "${LOCATION}" --sku Standard_LRS
After creating the storage account, we can now proceed with listing all identities in your resource group to ensure your principal is present:
az identity list -g "${RG_NAME}" -o tableThe table that appears after running this command presents an Azure Managed Identity, including crucial information such as the ClientId, Location, Name, PrincipalId, ResourceGroup, and TenantId.
Now let's use the Principal ID to create the role assignment:
az role assignment create
--role "Storage Blob Data Contributor"
--assignee-object-id "YOUR-PRINCIPAL-ID"
--assignee-principal-type "ServicePrincipal"
--scope "/subscriptions/${SUBSCRIPTION_ID}/resourceGroups/${RG_NAME}/providers/Microsoft.Storage/storageAccounts/<<YOUR-STORAGE-ACCOUNT-NAME>>"
The output will confirm the successful creation of the role assignment. Your user-assigned managed identity now has the "Storage Blob Data Contributor" role on the storage account. You can now use this managed identity to perform operations on the blob storage data in the storage account within the boundaries of the permissions that "Storage Blob Data Contributor" role provides.
Step 5: Create Azure identity for VVP Deployments
In this step, we are going to establish an Azure Identity specifically for VVP Deployments. This identity will enable us to effectively manage jobs and resources that are part of the VVP Deployments within your AKS cluster.
We start by setting USER_ASSIGNED_IDENTITY_NAME, SERVICE_ACCOUNT_NAME, and SERVICE_ACCOUNT_NAMESPACE:
export USER_ASSIGNED_IDENTITY_NAME="vvp-user-ident"
export SERVICE_ACCOUNT_NAME="vvp-jobs"
export SERVICE_ACCOUNT_NAMESPACE="vvp-jobs"
After this, we need to retrieve the client ID of your user-assigned identity:
export USER_ASSIGNED_CLIENT_ID="$(az identity show
--resource-group "${RG_NAME}"
--name "${USER_ASSIGNED_IDENTITY_NAME}"
--query 'clientId' -otsv)"
Now, let’s establish a new user-assigned identity for VVP Deployments. Remember to replace "${USER_ASSIGNED_IDENTITY_NAME}" with the name of the identity you intend to create, like "vvp-user-ident3":
az identity create
--name "${USER_ASSIGNED_IDENTITY_NAME}"
--resource-group "${RG_NAME}"
--location "${LOCATION}"
--subscription "${SUBSCRIPTION_ID}"
Upon successful execution of this command, you will receive a JSON object, representing your newly created User-Assigned Managed Identity in Azure. Now we need to create a federated credential for the new VVP Deployments user-assigned identity:
az identity federated-credential create --name userVvpJobs \
--identity-name "${USER_ASSIGNED_IDENTITY_NAME}" \
--resource-group "${RG_NAME}" --issuer "${AKS_OIDC_ISSUER}" \
--subject system:serviceaccount:"${SERVICE_ACCOUNT_NAMESPACE}":"${SERVICE_ACCOUNT_NAME}" \
--audience api://AzureADTokenExchange
By the end of this step, you will have successfully established an Azure identity for VVP Deployments and set up a federated credential for it. This identity is now ready to be used for managing jobs and resources associated with VVP Deployments in your AKS cluster.
Step 6. Create Kubernetes Service Account for vvp-jobs SERVICE_ACCOUNT_NAMESPACE
With the Azure identity for VVP Deployments created, it's time to create a Kubernetes Service Account for the vvp-jobs service account namespace, which we create by running:
kubectl create namespace vvp-jobs
This service account will be used to manage VVP Deployments within your Kubernetes cluster.
Create a configuration file vvp-jobs-service-account.yaml that specifies the setup of a Service Account named vvp-jobs in the vvp-jobs namespace:
apiVersion: v1
kind: ServiceAccount
metadata:
 annotations:
   azure.workload.identity/client-id: "${USER_ASSIGNED_CLIENT_ID}"
 labels:
   azure.workload.identity/use: "true"
 name: vvp-jobs
 namespace: vvp-jobs
Once the configuration file is ready, apply this setup using kubectl with the following command:
kubectl apply -f vvp-jobs-service-account.yaml
Upon execution, this command creates a new Service Account in your Kubernetes cluster that will be used by VVP Deployments to manage jobs and resources within your Kubernetes cluster.
Step 7: Install Ververica Platform
Now that we have created the necessary Azure identities and Service Accounts, we can proceed to install the Ververica Platform itself.
The first step is to add the Ververica Helm repository:
helm repo add ververica https://charts.ververica.comNext, we need to create a namespace for Ververica Platform in your Kubernetes cluster:
kubectl create namespace vvp
Create a values-vvp.yaml file that outlines the configuration of your Ververica Platform setup or amend the existing one with the following settings. To use Microsoft ABS Workload Identity, you'll need to include certain settings, such as your Azure client-id and, optionally, the tenant-id:
vvp:
  blobStorage:
    baseUri: wiaz://<blob-container-name>@<your account name>.blob.core.windows.net/managed
  globalDeploymentDefaults:
    spec:
      template:
        spec:
          kubernetes:
            jobManagerPodTemplate:
              metadata:
                labels:
                  azure.workload.identity/use: 'true'
              spec:
                serviceAccountName: vvp-jobs
            taskManagerPodTemplate:
              metadata:
                labels:
                  azure.workload.identity/use: 'true'
              spec:
                serviceAccountName: vvp-jobs

workloadIdentity:
  azure:
    clientId: <YOUR-CLIENT-ID>
    tenantId: <YOUR-TENANT-ID>
Now, we are ready to install the Helm chart while accepting the Community license agreement:
helm --namespace vvp \ install vvp ververica/ververica-platform \ --values values-vvp.yaml \
--set acceptCommunityEditionLicense=true
Once installed, give the pod a few seconds to start. At this point, the Ververica Platform should be functional within your AKS cluster. You can confirm the status of the deployment with this command:
kubectl get pods -n vvp
If everything is running as expected, you will see a list of active pods for the Ververica Platform.
To access the Ververica Platform, we enable port forwarding using this command:
kubectl --namespace vvp port-forward
services/vvp-ververica-platform 8080:80
After successfully executing these steps, you should be able to access the Ververica Platform at http://localhost:8080 on your local machine. There you have it, you've successfully installed the Ververica Platform!
You may also like

Data Sovereignty Is Existential Most Platforms Treat It Like a Feature

Dual Pipelines Are Done. Ververica Unifies Batch and Streaming.

A World Without Kafka
