
In previous posts, we walked you through how to get Ververica Platform up and running in Google Cloud Platform and Amazon Web Services. This time, we are focusing on Microsoft Azure and its hosted Kubernetes solution: Azure Kubernetes Service (AKS).
Recap
Ververica Platform (vvP) is an enterprise-ready real-time stream processing platform that brings together open source Apache Flink and other useful components, making stateful application lifecycle management easy and frictionless. It is built on Kubernetes as the underlying resource manager, and thus supports a wide range of deployment scenarios: from all major cloud vendors (Google Cloud Platform, Amazon AWS and Microsoft Azure) and on-premise to hybrid-cloud deployments using Red Hat OpenShift or vanilla Kubernetes.![[2020-07]-Ververica Platform+AKS-thumbnail](https://www.ververica.com/hs-fs/hubfs/%5B2020-07%5D-Ververica%20Platform+AKS-thumbnail.webp?width=600&height=300&name=%5B2020-07%5D-Ververica%20Platform+AKS-thumbnail.webp)
Pre-requisites
Before getting started, please make sure you:
-
Have an Azure account with a valid subscription and Compute, Networking, ContainerService and Storage resources enabled;
-
Download the Ververica Platform Kubernetes trial;
-
Install Azure CLI, kubectl and Helm on your local machine. For advanced configuration, also install Docker.
Note: this walkthrough refers to Ververica Platform 1.2.
Step 1: Spinning up an AKS Cluster for your Ververica Platform deployment.
Because we will have to brave through a couple of resources, let’s first create a resource group to keep things tidy and then create our AKS cluster within it. The rule of thumb is to have at least three nodes in the cluster, each with at least 6GB of memory.
$ az group create --name <resourceGroupName> -l <location>

$ az aks create --name <aksClusterName> --resource-group <resourceGroupName>
 --node-count 3 --node-vm-size Standard_DS2_v2 -x
Azure CLI enables RBAC (Role-based Access Control) by default, so after the provisioning of the cluster is finished we just need to configure kubectl to access it:
$ az aks get-credentials --resource-group <resourceGroupName> --name <aksClusterName>

$ kubectl get nodes
Step 2: Getting Helm and Tiller going to set up Ververica Platform on your AKS Cluster.
Helm is a two-sided package manager for Kubernetes, with a client-side (Helm) and a server-side that runs inside your Kubernetes cluster (Tiller). With RBAC enabled, Tiller will need a dedicated service account with the right roles and permissions to access resources. So, the next step is to create this service account and a cluster role binding to associate it with the cluster-admin role.
$ kubectl create serviceaccount tiller --namespace kube-system

$ kubectl create clusterrolebinding tiller-cluster-rule
--clusterrole=cluster-admin --serviceaccount=kube-system:tiller

$ helm init --service-account tiller --upgrade
If the previous commands were successful, we should be able to see Tiller running when executing the following:
$ kubectl get pods --namespace kube-system
Helm charts allow their configuration values to be set and overridden. To lend a hand in the installation process, the distribution includes a tool that produces a .yaml file to properly configure Ververica Platform for your environment. To finish this step up, navigate to the main directory of the Ververica Platform tarball and execute:
$ ./bin/generate-chart-values --with-rbac > values.yaml
After generating this file, we can use it alongside the included Helm chart to complete the installation:
$ helm install --name daplatform --values values.yaml daplatform-1.2.0.tgz
Step 3: Accessing and using the Web UI.
Part of the magic of setting up Ververica Platform is getting to use Application Manager, the core orchestration and lifecycle management component. To access it, we will simply configure a port forward to our container. Depending on your environment requirements, you might want to set up more robust access management using, for instance, Ingress.
$ POD_NAME=$(kubectl get pod -l release=daplatform,component=appmanager -o jsonpath=’{.items[0].metadata.name}’)

$ kubectl port-forward $POD_NAME 8080
What now?
Application Manager is finally available here and the time has come to create our first Deployment to launch a Flink job! To create a new Deployment, head over to the Web UI and hit the “Create Deployment” button (Figure 1 (1)).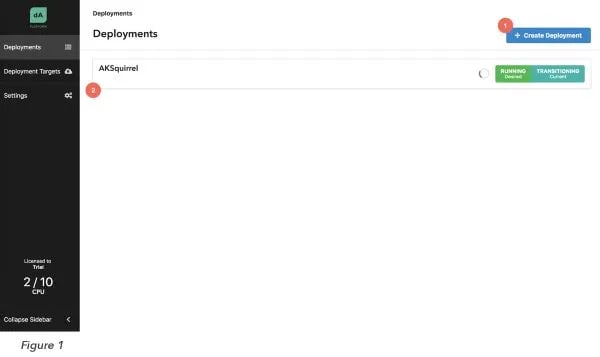
Fill in the form that is prompted with the following values: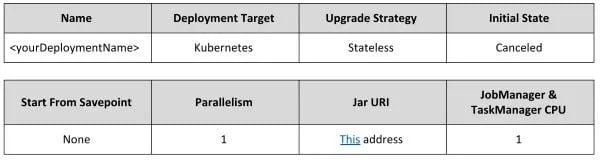
Once this is through, the deployment you just created should come up in the Deployment list (Figure 1 (2)). To launch a Flink cluster on Kubernetes for the sample job TopSpeedWindowing, just select the newly created Deployment from the list and press “Start” (Figure 2 (4)).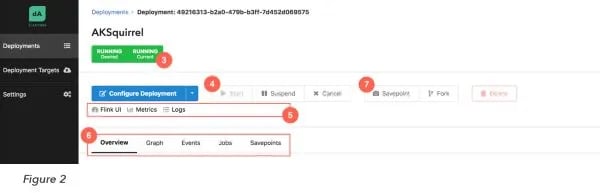
From here, Application Manager is your oyster: you can follow the status of your deployment (Figure 2 (3)), and explore details such as event logs, job history and (eventually) savepoints (Figure 2 (6)). In addition, you can dive into Grafana and Kibana to monitor and debug your application (Figure 2 (5)).
Advanced: Using Azure Blob Storage for Checkpoints and Savepoints.
In order to use Azure Storage services to persist checkpoints and savepoints, we need to set up a storage account and dedicated blob containers. For this walkthrough, we rolled with a general purpose account with locally-redundant replication to keep things simple.
$ az storage account create -n <sAccountName> -g <resourceGroup> -l <location> --sku Standard_LRS --kind StorageV2
The storage account we just created has an access key (<sAccountKey>) associated, which we have to first retrieve and pass as a parameter when creating the containers:
$ az storage account keys list -n <sAccountName> -g <resourceGroup>

$ az storage container create -n savepoints --account-name <sAccountName> --account-key <sAccountKey>

$ az storage container create -n checkpoints --account-name <sAccountName> --account-key <sAccountKey>
Now that storage is sorted out, we will build a custom Docker image of Flink with the required dependencies to access and use it. We start by creating a core-site.xml Hadoop configuration file:
<?xml version="1.0"?>
<?xml-stylesheet type="text/xsl" href="configuration.xsl"?>
<!-- Put site-specific property overrides in this file. -->
<configuration>
	<property>
	        <name>fs.wasbs.impl</name>
	        <value>org.apache.hadoop.fs.azure.NativeAzureFileSystem</value>
	</property>
	<property>
	        <name>fs.azure.account.key.daplatformstorage.blob.core.windows.net</name>
	        <value>your.account.key</value>
	</property>
</configuration>
Passing the account key as plain text is unarguably the least secure way to go, so we recommend that you obscure it for any non-demonstration scenarios. An option is to store this file in a secret and mount it into the containers making use of Application Manager’s integration with Kubernetes.
Next, we create a Dockerfile that includes instructions to retrieve the azure-storage connector and hadoop-azure, which will enable our application to consume Azure Storage services.
FROM registry.platform.data-artisans.net/trial/v1.2/flink:1.6.2-dap1-scala_2.11


RUN wget -O lib/hadoop-azure-2.8.1.jar http://central.maven.org/maven2/org/apache/hadoop/hadoop-azure/2.8.1/hadoop-azure-2.8.1.jar && \
 wget -O lib/azure-storage-2.2.0.jar http://central.maven.org/maven2/com/microsoft/azure/azure-storage/2.2.0/azure-storage-2.2.0.jar &&\
 wget -O lib/jetty-util-6.1.26.jar http://central.maven.org/maven2/org/mortbay/jetty/jetty-util/6.1.26/jetty-util-6.1.26.jar &&\
 wget http://ftp.fau.de/apache/flink/flink-1.6.2/flink-1.6.2-bin-hadoop28-scala_2.11.tgz && \
 tar xf flink-1.6.2-bin-hadoop28-scala_2.11.tgz && \
 mv flink-1.6.2/lib/flink-shaded-hadoop2* lib/ && \
 rm -r flink-1.6.2*
RUN mkdir etc-hadoop
 COPY core-site.xml etc-hadoop/
ENTRYPOINT ["/docker-entrypoint.sh"]
 EXPOSE 6123 8081
 CMD ["jobmanager"]
Make sure that core-site.xml and Dockerfile are under the same directory and then trigger the build:
$ docker build -t flink-1.6.2-wasb .
Boom!The last step is to host the image in Azure Container Registry (ACR). For this, we will create an account:
$ az acr create -n <acrAccountName> -g <resourceGroup> --sku Basic

$ az acr update -n <acrAccountName> --admin-enabled true
From the output of these commands, we want to keep <loginServer> at hand to tag the image and push it to the registry instance, after logging in to support authenticated Docker operations:
$ az acr login -n <acrAccountName>

$ docker tag flink-1.6.2-wasb <loginServer>/flink-1.6.2-wasb:latest

$ docker push <loginServer>/flink-1.6.2-wasb:latest
Take a breath. Now, we still need to give our AKS cluster permissions to access the ACR Docker registry we just pushed our image to.
$ CLIENT_ID=$(az aks show --resource-group  --name  --query "servicePrincipalProfile.clientId" --output tsv)

$ ACR_ID=$(az acr show --name <acrAccountName> --resource-group <resourceGroup> --query "id" --output tsv)

$ az role assignment create --assignee $CLIENT_ID --role Reader --scope $ACR_ID
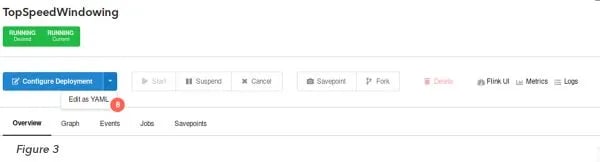
And we are all set! To override the configuration of your Application Manager deployment to use the custom Flink image we just created, either edit the Deployment configuration directly in the UI (Figure 3 (8)) or use the following cURL command:
$ curl -X PATCH --header ‘Content-Type: application/yaml’ --header ‘Accept: application/yaml’ -d ‘  spec: \

    template: \

      Spec: \

        flinkConfiguration: \

          fs.hdfs.hadoopconf: /opt/flink/etc-hadoop/ \

          state.savepoints.dir: wasb://savepoints@<sAccountName>.blob.core.windows.net/savepoints \

          state.checkpoints.dir: wasb://checkpoints@<sAccountName>.blob.core.windows.net/checkpoints \

        artifact: \

          flinkImageRegistry: <loginServer> \

          flinkImageRepository: flink-1.6.2-wasb \

          flinkImageTag: latest’ ‘http://localhost:8080/api/v1/deployments/<appManagerDeploymentID>’
After following these steps, you should be able to successfully checkpoint and trigger savepoints (Figure 2 (7)) to Azure Blob Storage.
Wrap-up:
Now that you have a fully operating Ververica Platform setup on AKS, we encourage you to play around and experiment with it! The official documentation will give you more detailed insights into the full scope of how Application Manager can be used to deploy, manage and debug your Flink streaming applications. Do not hesitate to reach out to Ververica for feedback, questions or any other requests!

You may also like
Preventing Blackouts: Real-Time Data Processing for Millisecond-Level Fault Handling
Real-Time Fraud Detection Using Complex Event Processing

Meet the Flink Forward Program Committee: A Q&A with Erik Schmiegelow