


Overview
Ververica Platform is a production-ready platform for stream processing with Apache Flink®. The Platform includes open source Apache Flink, a stateful stream processing and event-driven application framework, and VervericaApplication Manager, the central deployment and management component of the product.
Ververica Platform is built on Kubernetes as the underlying resource manager. Kubernetes is available in all major cloud providers, on-premise and also on single machines.
In this article, we describe the setup of Ververica Platform using Google Cloud’s Kubernetes Engine (GKE) as an example.
Setting upVerverica Platform on Amazon Web Services can also be easily accomplished, using kops (“Kubernetes Operations”) or on AWS EKS (“Elastic Container Service”). Microsoft Azure also provides a hosted Kubernetes platform called AKS (“Azure Kubernetes Service”).
We will provide documentation or blog posts on how to set up Ververica Platform on these offerings in the future.
In this blog post we guide you through the three essential steps for a successful setup of Ververica Platform on Google Cloud. Firstly, we will navigate you through the process of requesting a Kubernetes cluster on Google Cloud. Then, we’ll use Helm, the “package manager” of Kubernetes to set up Ververica Platform on the newly provisioned cluster.Finally, we’ll show you one of the ways of setting up access to the API and user interface of Ververica Platform.
Prerequisites
-
Download the dA Ververica Platform Kubernetes trial.
-
Install Google Cloud SDK, Kubectl and Helm on your local machine.
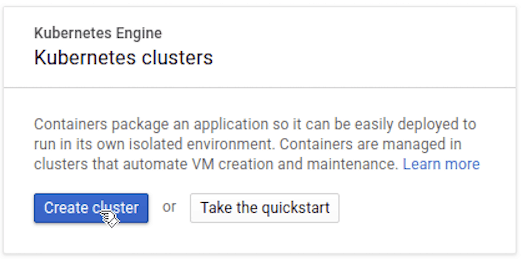
Create a Kubernetes Cluster for your VervericaPlatform deployment
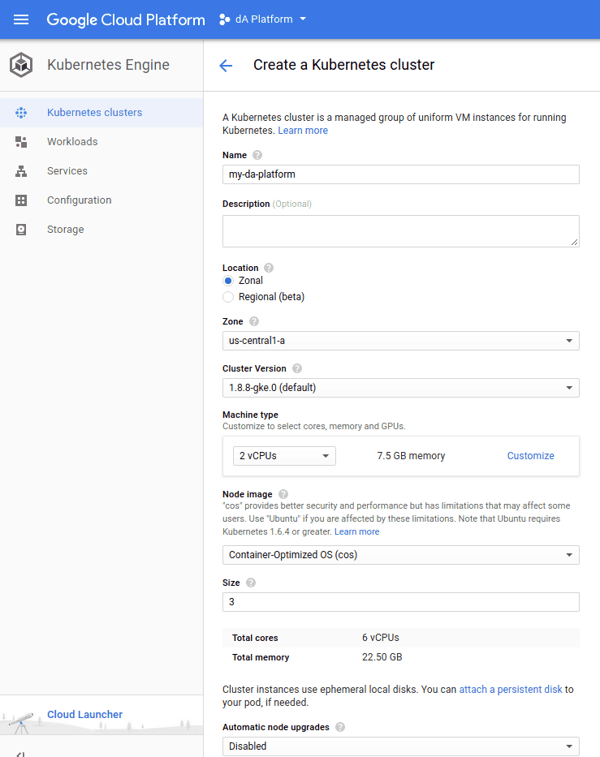
Log in to the Google Cloud Console, select Kubernetes clusters under the Kubernetes Engine section of the sidebar. There, create a Kubernetes cluster to deploy Ververica Platform on.
Give your cluster an appropriate name and select the desired zone. It is recommended to have at least 6Gb RAM per node and at least three nodes in the cluster.
Generate the Helm Values
From the main directory of the Ververica Platform tarball, run the following command:
$ ./bin/generate-chart-values --with-rbac > values.yamlFor detailed information about the generate-chart-valuet tool and how to override certain options, see the Helm Installation section in the Ververica Platform documentation.
Get access to your Kubernetes Cluster
In the Kubernetes clusters listing, click theConnect button. This will then pop up a ”gcloud” command that will configure kubectlto administer your cluster.

To verify, compare the current Kubectl context to the name of your Kubernetes cluster:
$ kubectl config current-contextInstall the Platform using Helm
This step presumes you have both kubectl and helm installed. Helm is a package manager for Kubernetes. It has a client/server architecture, with Tiller being Helm’s server component that runs on the Kubernetes cluster to perform operational tasks.
To deploy Tiller on your Kubernetes cluster, create the appropriate service account and cluster role binding:
$ kubectl --namespace kube-system create sa tiller$ kubectl create clusterrolebinding tiller --clusterrole cluster-admin --serviceaccount=kube-system:tiller$ helm init --service-account tillerTo verify that your environment is set up correctly, the following commands should complete without error:
$ kubectl get pods -n kube-system$ helm list(if there’s no result, everything is working as intended)
With the included Helm chart (named daplatform-1.0.0.tgz) and the values.yaml file generated in the previous step, complete the installation using helm install.
$ helm install --name my-da-platform --values values.yaml daplatform-1.0.0.tgzKubernetes will now deploy the dA Platform components. The “Workloads” tab of the Kubernetes Engine on Google Cloud Platform shows the status of the deployments.
Access the Web UI
To access Application Manager, dA Platform’s central orchestration and lifecycle management component, we’ll set up a port forward with kubectl.
For a permanent, production setup, we recommend setting up an Ingress or something else suitable for the environment.
Run the following commands for setting up the port forward:
$ POD_NAME=$(kubectl get pod -l release=my-da-platform,component=appmanager -o jsonpath='{.items[0].metadata.name}')$ kubectl port-forward $POD_NAME 8080Application Manager is now available in http://localhost:8080/.
Create your first Application Manager Deployment to launch a Flink job
For the first deployment, we’ll just submit a Flink example that is hosted on Maven Central.To create a new Deployment, open the Application Manager user interface, and click the “Create Deployment” button on the top right.
Fill the form with the following values:
-
Name: Enter any name
-
Deployment Target: Kubernetes
-
Upgrade Strategy: Stateless
-
Initial State: Cancelled
-
Start from Savepoint: None
-
Parallelism: 1
-
Jar URI
-
For JobManager and TaskManager CPU: 1
Finally, press the “Create Deployment” button, select the newly created Deployment from the list, and press “Start” to launch a Flink cluster on Kubernetes for the job.
In this example, we used a jar from Maven. For running your own jar files, you need to store the file in cloud storage accessible by the Application Manager (for example publicly on GitHub or in Google Cloud Storage Bucket). Alternatively, deploy Minio into the Kubernetes cluster. Minio is a S3-compatible object storage server.
Advanced: Set up access to Google Cloud Storage for checkpoints and savepoints.
dA Platform unfolds it’s full capabilities when it’s able to use a central state store for Flink. In most cases, S3, HDFS or Google’s cloud storage act as such a central state store for our existing customers.
In case of Amazon, Flink comes with built-in support for S3. But since we are using Google Cloud for this tutorial, we’ll show you how to set up dA Platform and Flink to use Google’s tools.
For accessing Cloud Storage, we need to add the Cloud Storage connector and Hadoop (because the connector is relying on Hadoop’s FileSystem implementation) into the lib/folder of Flink.
We will build a custom docker image, which will include the additional files in the lib/folder.
Also, we’ll include the needed credentials into the Docker image, for the sake of simplicity here. (For a production setup, we would recommend putting the configuration files into Kubernetes config maps and secrets.)
Set up access to Cloud Storage
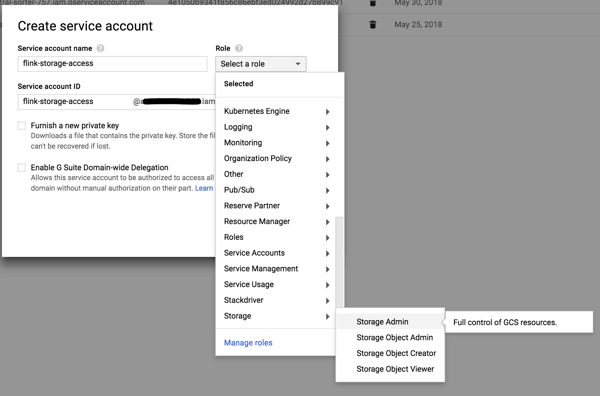
We will create a service account in Google Cloud, which has permission to access Cloud Storage. Navigate to “IAM & admin”, and then to “Service Accounts”.Create a new service account, with the “Storage Admin” role.
 For the service account, create a new “JSON” key:
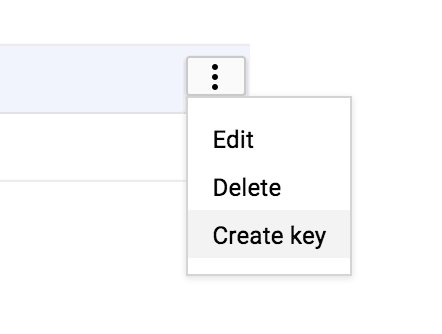 Store the key file in a temporary directory, and note its name.
Next to the service account key file (the JSON file we just created), create a new file called “core-site.xml”with the following contents:
<?xml version="1.0"?>
	<?xml-stylesheet type="text/xsl" href="configuration.xsl"?>
	<!-- Put site-specific property overrides in this file. -->
	<configuration>
	<property>
	<name>google.cloud.auth.service.account.enable</name>
	<value>true</value>
	</property> <property>
	<name>google.cloud.auth.service.account.json.keyfile</name>
	<value>/opt/flink/etc-hadoop/<name of key file>.json</value>
	</property>
</configuration>
Be sure to put the proper name of the JSON file in there.
Creating a custom Docker image
Finally, we need to create a custom Docker image. For that, we create the following Dockerfile:
	FROM registry.platform.data-artisans.net/trial/v1.0/flink:1.4.2-dap1-scala_2.11

RUN wget -O lib/gcs-connector-latest-hadoop2.jar https://storage.googleapis.com/hadoop-lib/gcs/gcs-connector-latest-hadoop2.jar
RUN wget -O lib/gcs-connector-latest-hadoop2.jar https://storage.googleapis.com/hadoop-lib/gcs/gcs-connector-latest-hadoop2.jar && \
   wget
http://ftp.fau.de/apache/flink/flink-1.4.2/flink-1.4.2-bin-hadoop28-scala_2.11.tgz && \
tar xf flink-1.4.2-bin-hadoop28-scala_2.11.tgz && \
mv flink-1.4.2/lib/flink-shaded-hadoop2* lib/  && \
rm -r flink-1.4.2*

RUN mkdir etc-hadoop
COPY <name of key file>.json etc-hadoop/
COPY core-site.xml etc-hadoop/

ENTRYPOINT ["/docker-entrypoint.sh"]
EXPOSE 6123 8081
CMD ["jobmanager"]
The Docker image will be based on the Flink image we’re providing as part of the dA Platform trial. We are adding the Google Cloud Storage connector, Flink’s Hadoop package and the key with the configuration file.
To build the custom image, the following files should be in your current directory:core-site.xml, Dockerfileand the key-file (.json)
To finally trigger the build of the custom image, we run the following command:
$ docker build -t flink-1.4.2-gs .Once the image has been built, we will upload the image to Google’s Container Registry.To configure Docker to properly access the registry, run this command once:
$ gcloud auth configure-dockerNext, we’ll tag and upload the container:
$ docker tag flink-1.4.2-gs:latest eu.gcr.io/
<your project id>/
flink-1.4.2-gs
$ docker push eu.gcr.io/
<your project id>/
flink-1.4.2-gs
Once the upload is completed, we need to set the custom image for an Application Manager deployment.Sent the following PATCH request:
	PATCH /api/v1/deployments/
<your AppMgr deployment id>
spec:
template:
spec:
flinkConfiguration:
fs.hdfs.hadoopconf: /opt/flink/etc-hadoop/
artifact:
flinkImageRegistry: eu.gcr.io
flinkImageRepository: <your project id>/flink-1.4.2-gs
flinkImageTag: latest
Alternatively, use the following curl c command:
$ curl -X PATCH --header 'Content-Type: application/yaml' --header 'Accept: application/yaml'
 -d ' spec: \
 template: \
 spec: \
 flinkConfiguration:fs.hdfs.hadoopconf: /opt/flink/etc-hadoop/
 artifact: \
 flinkImageRegistry: eu.gcr.io \
 flinkImageRepository: <your project id>/flink-1.4.2-gs \
 flinkImageTag: latest' 'http://localhost:8080/api/v1/deployments/<your AppMgr deployment id>
With this change implemented, you’ll be able to checkpoint to Google’s Cloud Storage. Use the following pattern when specifying the directory
gs://<your Cloud Storage bucket id>/checkpointsFor savepoints, set the state.savepoints.dir Flink configuration option.
Next Steps
Check out the full Ververica Platform documentation, to learn what’s possible with Application Manager to deploy, manage and debug your Apache Flink streaming applications.
Do not hesitate to reach out to data Artisans for feedback, questions or requests for larger trial licenses.
You may also like

Your AI Coding Assistant Can't Touch Your Streaming Platform. Until Now

Zero Trust Theater and Why Most Streaming Platforms Are Pretenders

No False Trade-Offs: Introducing Ververica Bring Your Own Cloud for Microsoft Azure
