
Microsoft Azure Pipelines is one of the most popular Continuous Integration (CI)/Continuous Delivery(CD) platforms. In this article, we will walk you through the steps to integrate Microsoft Azure Pipelines with Ververica Platform running on Azure Kubernetes Service (AKS). This integration hooks into the code repository of your Flink job to ensure that any change you make does not cause new errors or regressions by verifying your job's behavior in a true cluster setup based on Ververica Platform. With this integration, every change to the repository would automatically trigger Azure Pipelines to build a new artifact and deploy it to Azure Blob storage. The new artifact is then used to update a deployment which restarts your Flink job for testing. By checking the state of this deployment, you can tell whether the new change causes any failure and, if necessary, take actions accordingly.
![[2020-07]-VVP+Azure Pipelines](https://www.ververica.com/hs-fs/hubfs/%5B2020-07%5D-VVP+Azure%20Pipelines.png?width=677&name=%5B2020-07%5D-VVP+Azure%20Pipelines.png)
Prerequisites
This article assumes that you have basic knowledge about Microsoft Azure Pipelines. Before you start, make sure you also have the following setup in place:
-
A running Ververica Platform instance on Azure Kubernetes Service (AKS) using Azure Blob Storage.
Detailed instructions on how to set this up have been given in our recent blog post Getting Started with Ververica Platform on Microsoft Azure, part 2. -
A GitHub repository containing your Flink job’s code.
In addition, we assume authentication is activated in Ververica Platform as it is a typical production setup. If you do not have authentication, you may ignore the steps like to create and store API tokens and remove the use of API tokens in the pipeline configuration.
Introduction
This article covers the following steps in the given order:
-
Prepare your repository by adding a Ververica Platform deployment specification file to it.
-
Create an Azure Active Directory service principal for Azure Pipelines to connect to Azure resources.
-
Create an Azure Key Vault to store the secrets like the password of the service principal, etc.
-
Create an Azure Pipelines project and a service connection in the Azure DevOps portal.
-
Create a pipeline in the new project and configure it by defining pipeline stages and tasks.
-
Run the pipeline and trigger the automatic pipeline run with repository changes.
|
|
Prepare Repository
Add a Ververica Platform deployment specification file to your repository. You can download this file from an existing deployment in Ververica Platform and adapt the file to use two placeholders: DEPLOYMENTTARGETID for the Deployment Target ID and JARURI for the URI to your job's jar file. You can also derive the file from our deployment specification example which contains a minimal set of attributes that suit our needs. As you will see later in this article, the placeholders will be substituted by the variables defined in our pipeline and the file, after substitution, will be used to update a deployment in Ververica Platform. If desired, you can adapt the rest of the specification to your setup. You can also have a look at the complete Azure Pipelines demo GitHub repository which includes all the code mentioned below and an example of such a repository layout.
Create Azure Active Directory Service Principal
The Azure Active Directory service principal serves two purposes:
-
Azure Pipelines uses this service principal to connect to Azure services, e.g., to access Azure Key Vault, to upload artifacts to Azure Blob storage, etc. As we will see later in this article, the service principal is stored in the service connection of our Azure Pipelines project.
-
Azure Pipelines uses this service principal on the created virtual machines to connect to the AKS Cluster running Ververica Platform to submit Flink jobs.
Now, let us create the service principal:
az ad sp create-for-rbac --name http://vvp-pipeline-service-principal
|
|
Create Key Vault
Now we create a key vault and store the service principal password in it:
az keyvault create --resource-group vvp-pipeline-demo \
  --name vvp-pipeline-keyvault
az keyvault secret set --vault-name vvp-pipeline-keyvault \
  --name servicePrincipalKey --value <service-principal-password>
Since our pipeline will use the created service principal to access Azure services like Key Vault, we need to grant it permissions to get and list secrets from the Key Vault:
az keyvault set-policy --name vvp-pipeline-keyvault \
  --spn http://vvp-pipeline-service-principal \
  --secret-permissions get list
In addition to the service principal password, create a Ververica Platform API token and store its secret in the Key Vault:
az keyvault secret set --vault-name vvp-pipeline-keyvault \
  --name vvpAPIToken --value <Ververica Platform API Token>
We also store our tenant ID in the Key Vault as we do not want to expose our Azure tenant ID publicly:
az ad sp show --id http://vvp-pipeline-service-principal | grep -i tenantId
az keyvault secret set --vault-name vvp-pipeline-keyvault \
  --name tenantID --value <Azure tenantID>
Create Pipeline Project
If you do not have an Azure Pipelines project yet, please create a project now. In the project, we then need to create a service connection that gives our project access to the previously created Key Vault and the Azure Blob Storage connected to the Ververica Platform instance.
Create Service Connection
Please follow the Azure documentation on creating service connections and make sure that you:
-
select Azure Resource Manager as the service connection type
-
select Service principal (manual) as the authentication method
-
use the service principal name we created before and its password/key
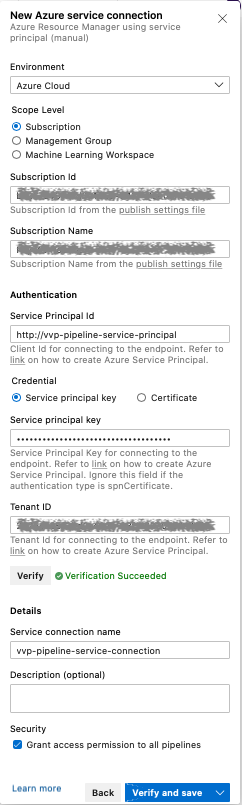
Note down the service connection name you specified. You will need it in the pipeline configuration.
Create Pipeline
Now the project and its service connection are created, we can create a pipeline for the code repository of your Flink job. When you are about to configure the pipeline, select Starter pipeline. The file azure-pipelines.yml is then opened in your browser. The content of this file is generated by Azure (assuming you have never configured Azure Pipelines for this repository) and the file will be added into your repository upon saving. Remove everything from the file, as we will configure the pipeline from scratch.
The pipeline configuration consists of three sections: Global settings plus two stages, namely, BuildDeploy and SubmitCheck. You can copy and paste all three sections, one after the other, into azure-pipelines.yml and do any necessary adjustments based on the description of each section below.
Global Settings
The global settings section consists of three parts: resources, trigger and variables:
trigger:
- master

variables:
  # Azure Resource Manager service connection
  azureSubscription: 'vvp-pipeline-service-connection'

  # Azure resources
  resourceGroup: 'vvp-pipeline-demo'
  storageAccount: 'vvppipelinestorage'
  blobContainer: 'vvp-pipeline-container'
  servicePrincipal: 'http://vvp-pipeline-service-principal'
  keyVault: 'vvp-pipeline-keyvault'

  # Kubernetes
  kubernetesCluster: 'vvp-pipeline-cluster'
  kubernetesNamespace: 'vvp'

  # Ververica Platform
  vvpNamespace: 'default'
  jarFileName: 'vvp-pipeline-demo-0.1.jar'
  jarLocation: 'wasbs://$(blobContainer)@$(storageAccount).blob.core.windows.net/artifacts/namespaces/$(vvpNamespace)/$(jarFileName)'
  deploymentId: 'd320ec04-16f5-4915-b236-6efa43b7e003'
  deploymentTargetId: '6232cc84-7aa3-4524-b3a8-36cab7203c47'
  vvpDeploymentSpecFile: 'azure-pipelines-vvp-deployment.yml'
The trigger part says we would like to trigger the pipeline run from any change to the master branch. More advanced setups are discussed in the Trigger a pipeline section in the Azure Pipelines documentation on the GitHub integration.
The variables part defines the variables used in the pipeline. The name of the service connection to the previously created service principal, for example, is provided here so that tasks defined below, e.g. AzureFileCopy@3 and AzureKeyVault@1, can use it. The servicePrincipal and keyVault are the previously created service principal and Key Vault. The Ververica Platform variables are specific to your Ververica Platform setup and should be adapted accordingly. The last variable vvpDeploymentSpecFile points to the file we added into the code repository of your Flink job at the beginning.
|
|
The BuildDeploy Stage
The BuildDeploy stage is made of one job which consists of two tasks. As part of the job preparation, Azure Pipelines checks out the code repository of your Flink job locally. It then runs maven to build artifacts and deploy the produced artifacts to the Azure Blob storage as specified by storageAccount and blobContainer. The path specified for BlobPrefix is specific to Ververica Platform's Universal Blob Storage. That is the path where Ververica Platform looks for artifacts for a given Ververica Platform namespace. This path should be consistent with the path used in jarLocation specified in the global settings section.
stages:

# BuildDeploy stage
- stage: BuildDeploy
  jobs:
  - job: BuildDeploy

    pool:
      vmImage: 'windows-latest' # windows is required by AzureFileCopy@3

    steps:
    - task: Maven@3
      displayName: Maven package

    - task: AzureFileCopy@3
      displayName: Deploy to blob storage
      inputs:
        sourcePath: 'target/$(jarFileName)'
        azureSubscription: '$(azureSubscription)'
        destination: 'AzureBlob'
        storage: '$(storageAccount)'
        containerName: '$(blobContainer)'
        BlobPrefix: 'artifacts/namespaces/$(vvpNamespace)'
The SubmitCheck Stage
The SubmitCheck stage depends on the BuildDeploy stage. It starts to run only after the BuildDeploy stage succeeds. In the SubmitCheck stage, we first install kubectl locally and get the stored secrets from Azure Key Vault. The retrieved secrets are then available to the subsequent tasks via Azure Pipelines task variables.
# Submit stage
- stage: SubmitCheck
  dependsOn: BuildDeploy
  condition: succeeded()

  jobs:
  - job: SubmitCheck

    pool:
      vmImage: 'ubuntu-latest'

    steps:
    - task: KubectlInstaller@0
      displayName: Install kubectl

    - task: AzureKeyVault@1
      displayName: Get secrets
      inputs:
        azureSubscription: '$(azureSubscription)'
        KeyVaultName: '$(keyVault)'
        SecretsFilter: 'servicePrincipalKey,vvpAPIToken,tenantId'
Next, we setup local access to Ververica Platform. In the PATCH deployment task, we substitute the two placeholders DEPLOYMENTTARGETID and JARURI in the deployment specification file and call the REST API of Ververica Platform to update the deployment. After the deployment is updated, we wait for 90 seconds before checking the state. The Check state task fails if the deployment state is not RUNNING. Alternatively, you can also check the state periodically (e.g., every 10 seconds) until it succeeds or times out. You can also perform additional tests to verify the behavior of your Flink job.
# SubmitCheck stage continued
    - bash: |
        az login --service-principal -u $(servicePrincipal) \
          -p $(servicePrincipalKey) --tenant $(tenantId)
        az aks get-credentials --resource-group $(resourceGroup) \
          --name $(kubernetesCluster)
        kubectl port-forward service/vvp-ververica-platform 8080:80 \
          --namespace $(kubernetesNamespace) &
      displayName: Setup access
    - bash: |
        cat "$(vvpDeploymentSpecFile)" | \
            sed -e "s|DEPLOYMENTTARGETID|$(deploymentTargetId)|g" \
                -e "s|JARURI|$(jarLocation)?commit=$(Build.SourceVersion)|g" |
        curl -X PATCH "http://localhost:8080/api/v1/namespaces/$(vvpNamespace)/deployments/$(deploymentId)" \
            -H "Authorization: Bearer $(vvpAPIToken)" \
            -H "accept: application/yaml" -H "Content-Type: application/yaml" \
            -s --data-binary @-
      displayName: PATCH deployment
    - bash: sleep 90
      displayName: Wait
    - bash: |
        state=`curl -X GET "http://localhost:8080/api/v1/namespaces/$(vvpNamespace)/deployments" \
            -H "Authorization: Bearer $(vvpAPIToken)" \
            -H "accept: application/json" -s | \
            jq -r '.items[] | select (.metadata.id == "$(deploymentId)" )
            | .status.state'`
        echo "Deployment State is: \"$state\""
        [ "$state" == "RUNNING" ] || exit 1
      displayName: Check state
Run Pipeline
Now that the pipeline configuration file is ready, you can click Save and run. This will add the file azure-pipelines.yml to your repository and trigger the pipeline run. After the PATCH deployment step, the Ververica Platform deployment will be gracefully stopped with a savepoint and restarted from the created savepoint. Once the pipeline run finishes, you can verify whether there are any failures.
|
|
Now, if you push a commit to your repository, e.g., changing your Flink job’s code or updating the Ververica Platform deployment specification, another pipeline run will be triggered automatically. Similarly, the Ververica Platform deployment will be gracefully stopped and restarted again.
Be aware that if you change the job's code without setting a new version and without changing anything significant in the deployment specification, Ververica Platform normally does not restart the deployment upon PATCH. The reason is that from the deployment specification's point of view, everything is the same as before, i.e., the actual state matches the desired state. Here we implement a trick: appending the commit hash to the end of jarURI, as you can see in the PATCH deployment task:
-e "s|JARURI|$(jarLocation)?commit=$(Build.SourceVersion)|g"
Appending ?commit=${Build.SourceVersion} to jarURI causes Ververica Platform to notice a change and perform a restart. The added commit hash is not used anywhere else in Ververica Platform and is ignored when fetching the artifact from Azure Blob Storage.
Summary
This article illustrated the steps required to integrate Microsoft Azure Pipelines with Ververica Platform. We added a Ververica Platform deployment specification file into your repository. We described how to create an Azure Pipelines project and its service connection to Azure resources. We also presented in detail how to configure the pipeline such that any change in your repository is built, deployed, submitted and checked automatically through the pipeline run. We achieved this with a total of ~100 lines of pipeline configuration code.
If you have any feedback on how to set up Azure Pipelines or would like to contribute extensions, feel free to contact us or leave comments in our Github repository.


You may also like
Preventing Blackouts: Real-Time Data Processing for Millisecond-Level Fault Handling
Real-Time Fraud Detection Using Complex Event Processing

Meet the Flink Forward Program Committee: A Q&A with Erik Schmiegelow