Welcome to the third post in our Ververica Platform Community Edition series. The first two posts covered installation and common operational activities.
If you missed the first part and want to go over the installation process, Part 1 of Analyzing GitHub Activity with Ververica Platform Community Edition provides everything for you. You can access it here.
The second part of the series covered how Veverica Platform Community Edition performs Upgrade Strategiesand offers Kubernetes High Availability. You can go directly to Part 2 of Analyzing GitHub Activity with Ververica Platform Community Editionhere.
Up to this point, we have worked with the Simple view when managing Deployments. The properties shown on this screen, such as JAR and parallelism, are the configurations that are most regularly modified. While Ververica Platform strives to provide sensible default configurations that work out-of-the-box, it does not prevent users from making low level configuration changes on any Deployment.
Deployment Defaults
Often, as the adoption of Flink grows within an organization, users find themselves with a set of standard configurations they apply to most, if not all, Deployments. Common use cases include always enabling Kubernetes High-Availability or ensuring that every deployment uses a centralized metrics reporting and logging solution. Ververica Platform offers setting default configurations that are inherited by all Deployments.
Navigate to the Deployment Defaults page in the Administration section of the navigation column on the left-hand side. Here, you will find a full list of advanced configurations that you can tweak to ensure your Flink deployments are tuned to your organization's needs.
The first section describes the behavior of a deployment and how upgrades should be performed. In most cases, it makes sense to default this behavior using Stateful upgrades based on Latest State. You can also choose a default Flink version for all deployments.
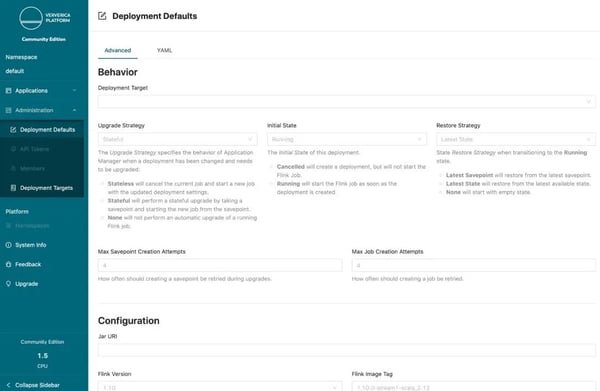
Next you will find all the standard Flink configurations that are described in the official Apache Flink documentation. Certain settings that may be tricky to configure are available here with one click.
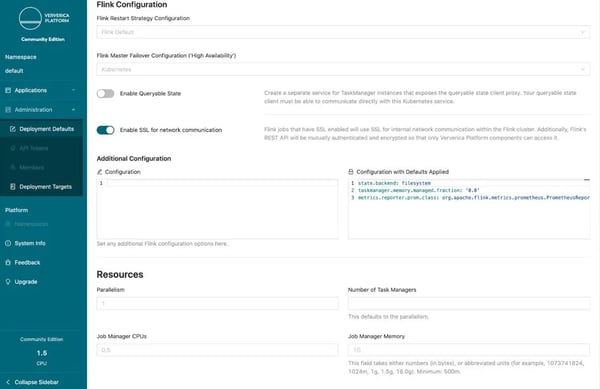
One of the most interesting is one-click SSL enablement. Often, Flink applications solve critical business challenges that have strict regulatory and security requirements. When SSL is enabled, all internal network communication within the Flink cluster will be encrypted. Additionally, Flink's REST API is mutually authenticated and encrypted so that only Ververica Platform components can access it.
Sometimes, engineering teams will not enable SSL due to concerns that the additional overhead will result in performance degradation. This is why Ververica Platform ships with OpenSSL out-of-the-box. We have found OpenSSL to be up to 210% more performant than the JDK variant. You can read more about OpenSSL and our benchmarking on the Ververica blog.
Go ahead and enable SSL for all deployments.The final two sections describe pod resources and logging configurations. Flink clusters consist of a number of distributed components and you can have fine-grained control over the amount of memory and hardware resources assigned to each piece.
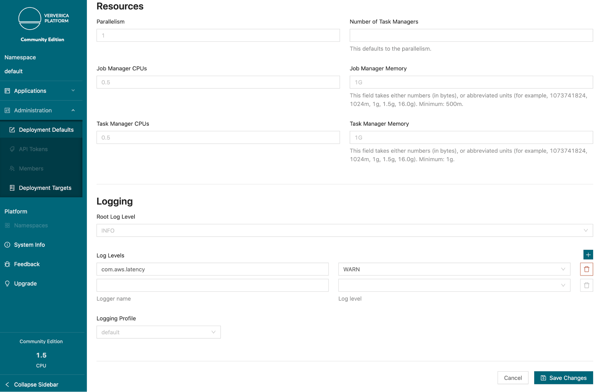
In the logging section, you have access to assigning custom log levels and templates. For example, if your organization prefers all logging as JSON, then you can configure a custom logging profile to do just that.
One change you can make today is reduce the log level of the AWS client used by the S3 library for checkpointing.
After making any changes, press Save Changes. Even though these configurations have been updated, the running Flink Repo Analytics deployment will remain unaffected. Changing deployment defaults does not affect existing pipelines; only new deployments will be affected going forward.
Managing Secrets
In the first blog post, when originally deploying the repository analytics job, we could not set our start date to more than 7 days in the past to avoid being throttled by GitHub’s API. This can be circumvented by using a GitHub API Token to authenticate the client. However, this type of credential is sensitive and should not be shared with all members of the team or stored in plain text.
Additionally, industry best practices state we should provide the token to our job as an environment variable to avoid accidentally leaking the value in logs. Luckily, Ververica Platform supports both of these use cases by offering deep integration with Kubernetes secrets and pod configurations.
Create a GitHub OAUTH token with the default permissions and copy the value. Next, store the token as a secret on your Kubernetes cluster.
$ kubectl create secret generic github-token --from-literal=github-api-token=’[token]’
Back inside the platform, navigate to the repository analytics deployment, click Configure Deployment and go to the YAMLi> page. This page shows the same configurations as the Advanced configurations, but in YAML format.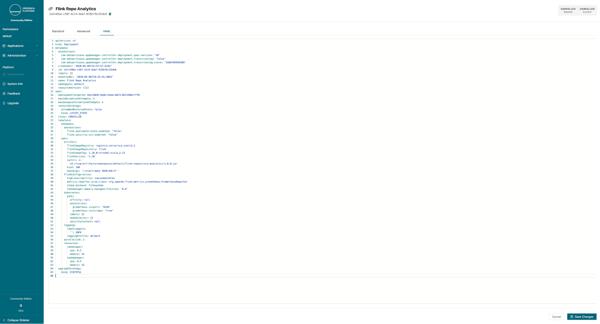
Now that you have access to an API token, you would like to backfill an entire year’s worth of Flink repository analytics. This is one of the few times in which it makes sense to restart a deployment without any initial state. We need to begin processing from a new position. Because the application uses event time, we know we are guaranteed identical results for the hours that are reprocessed.
Change the restart strategy to NONE and the start date flag to a date at least one year in the past. Finally, set the secret as an environment variable in the pods by putting the below configuration into the YAML specification.
spec:
 template:
  spec:
   kubernetes:
    pods:
     envVars:
      - name: GITHUB_OAUTH
       valueFrom:
        secretKeyRef:
	       name: github-token
         Key: github-api-token
You can now press Save to deploy the change. If you navigate to the Grafana dashboard you will see an entire years worth of data.
Conclusion
Ververica Platform was built by the original creators of Apache Flink to provide a turnkey solution for running streaming applications in production. It removes operational burden so organizations can focus on their core business development. If you are interested in trying out the platform, full documentation covering installation and usage is available on our website. If you have any questions do not hesitate to contact the team at community-edition@ververica.com.

